User guide · v3.1.2
Getting the most out of Flexa Unsubscribe
A step-by-step walkthrough of every admin screen - no code required. Follow it in order the first time, then dip back in whenever you need a refresher.
Step 1
Getting started
Once the plugin is activated you’ll find a new Unsubscribe item in the WordPress admin menu on the left. Everything in this guide lives under that menu.
- In the WordPress admin sidebar, click Unsubscribe. It sits in the lower group of the menu, near Settings.
- The plugin opens on its Dashboard. The sub-tabs along the top - Dashboard, Unsubscribes, Blocked Emails, Re-subscribed, Reasons, Settings, Appearance - are the seven screens covered below.
Who can see this?
Only administrators (users who can “manage options”) can open the Flexa Unsubscribe screens. Editors and shop managers won’t see the menu.
Step 2
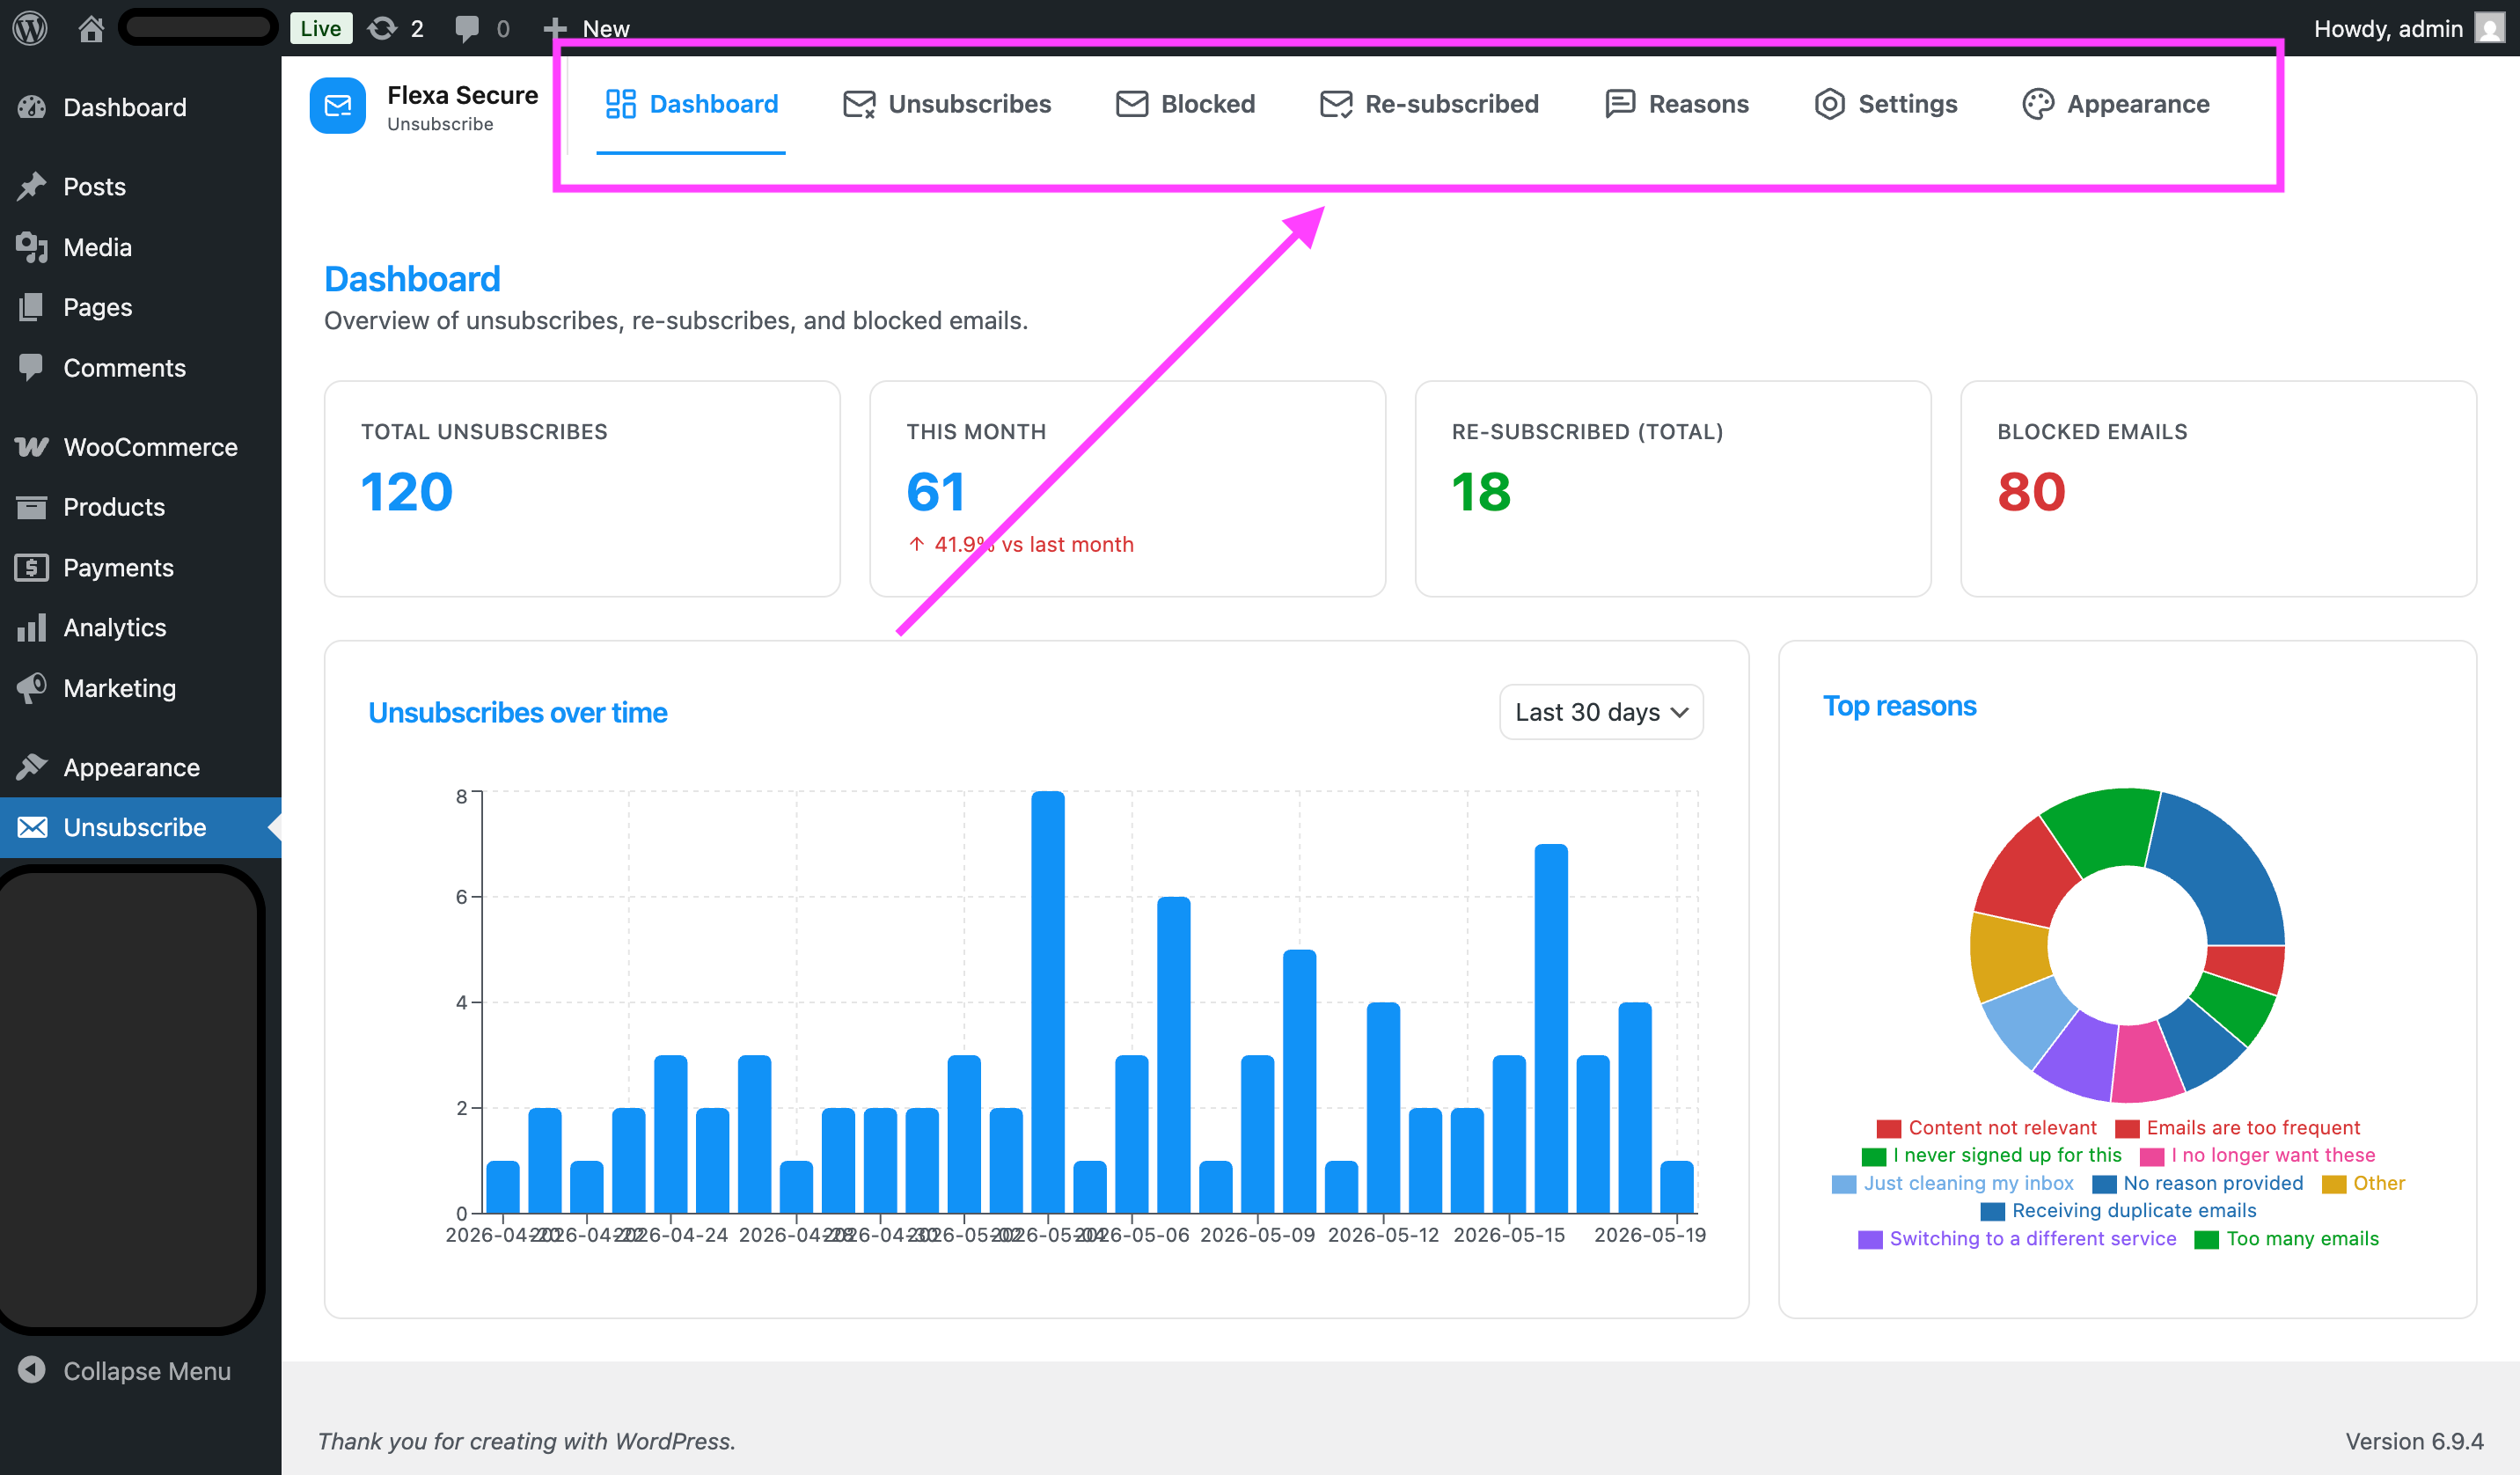
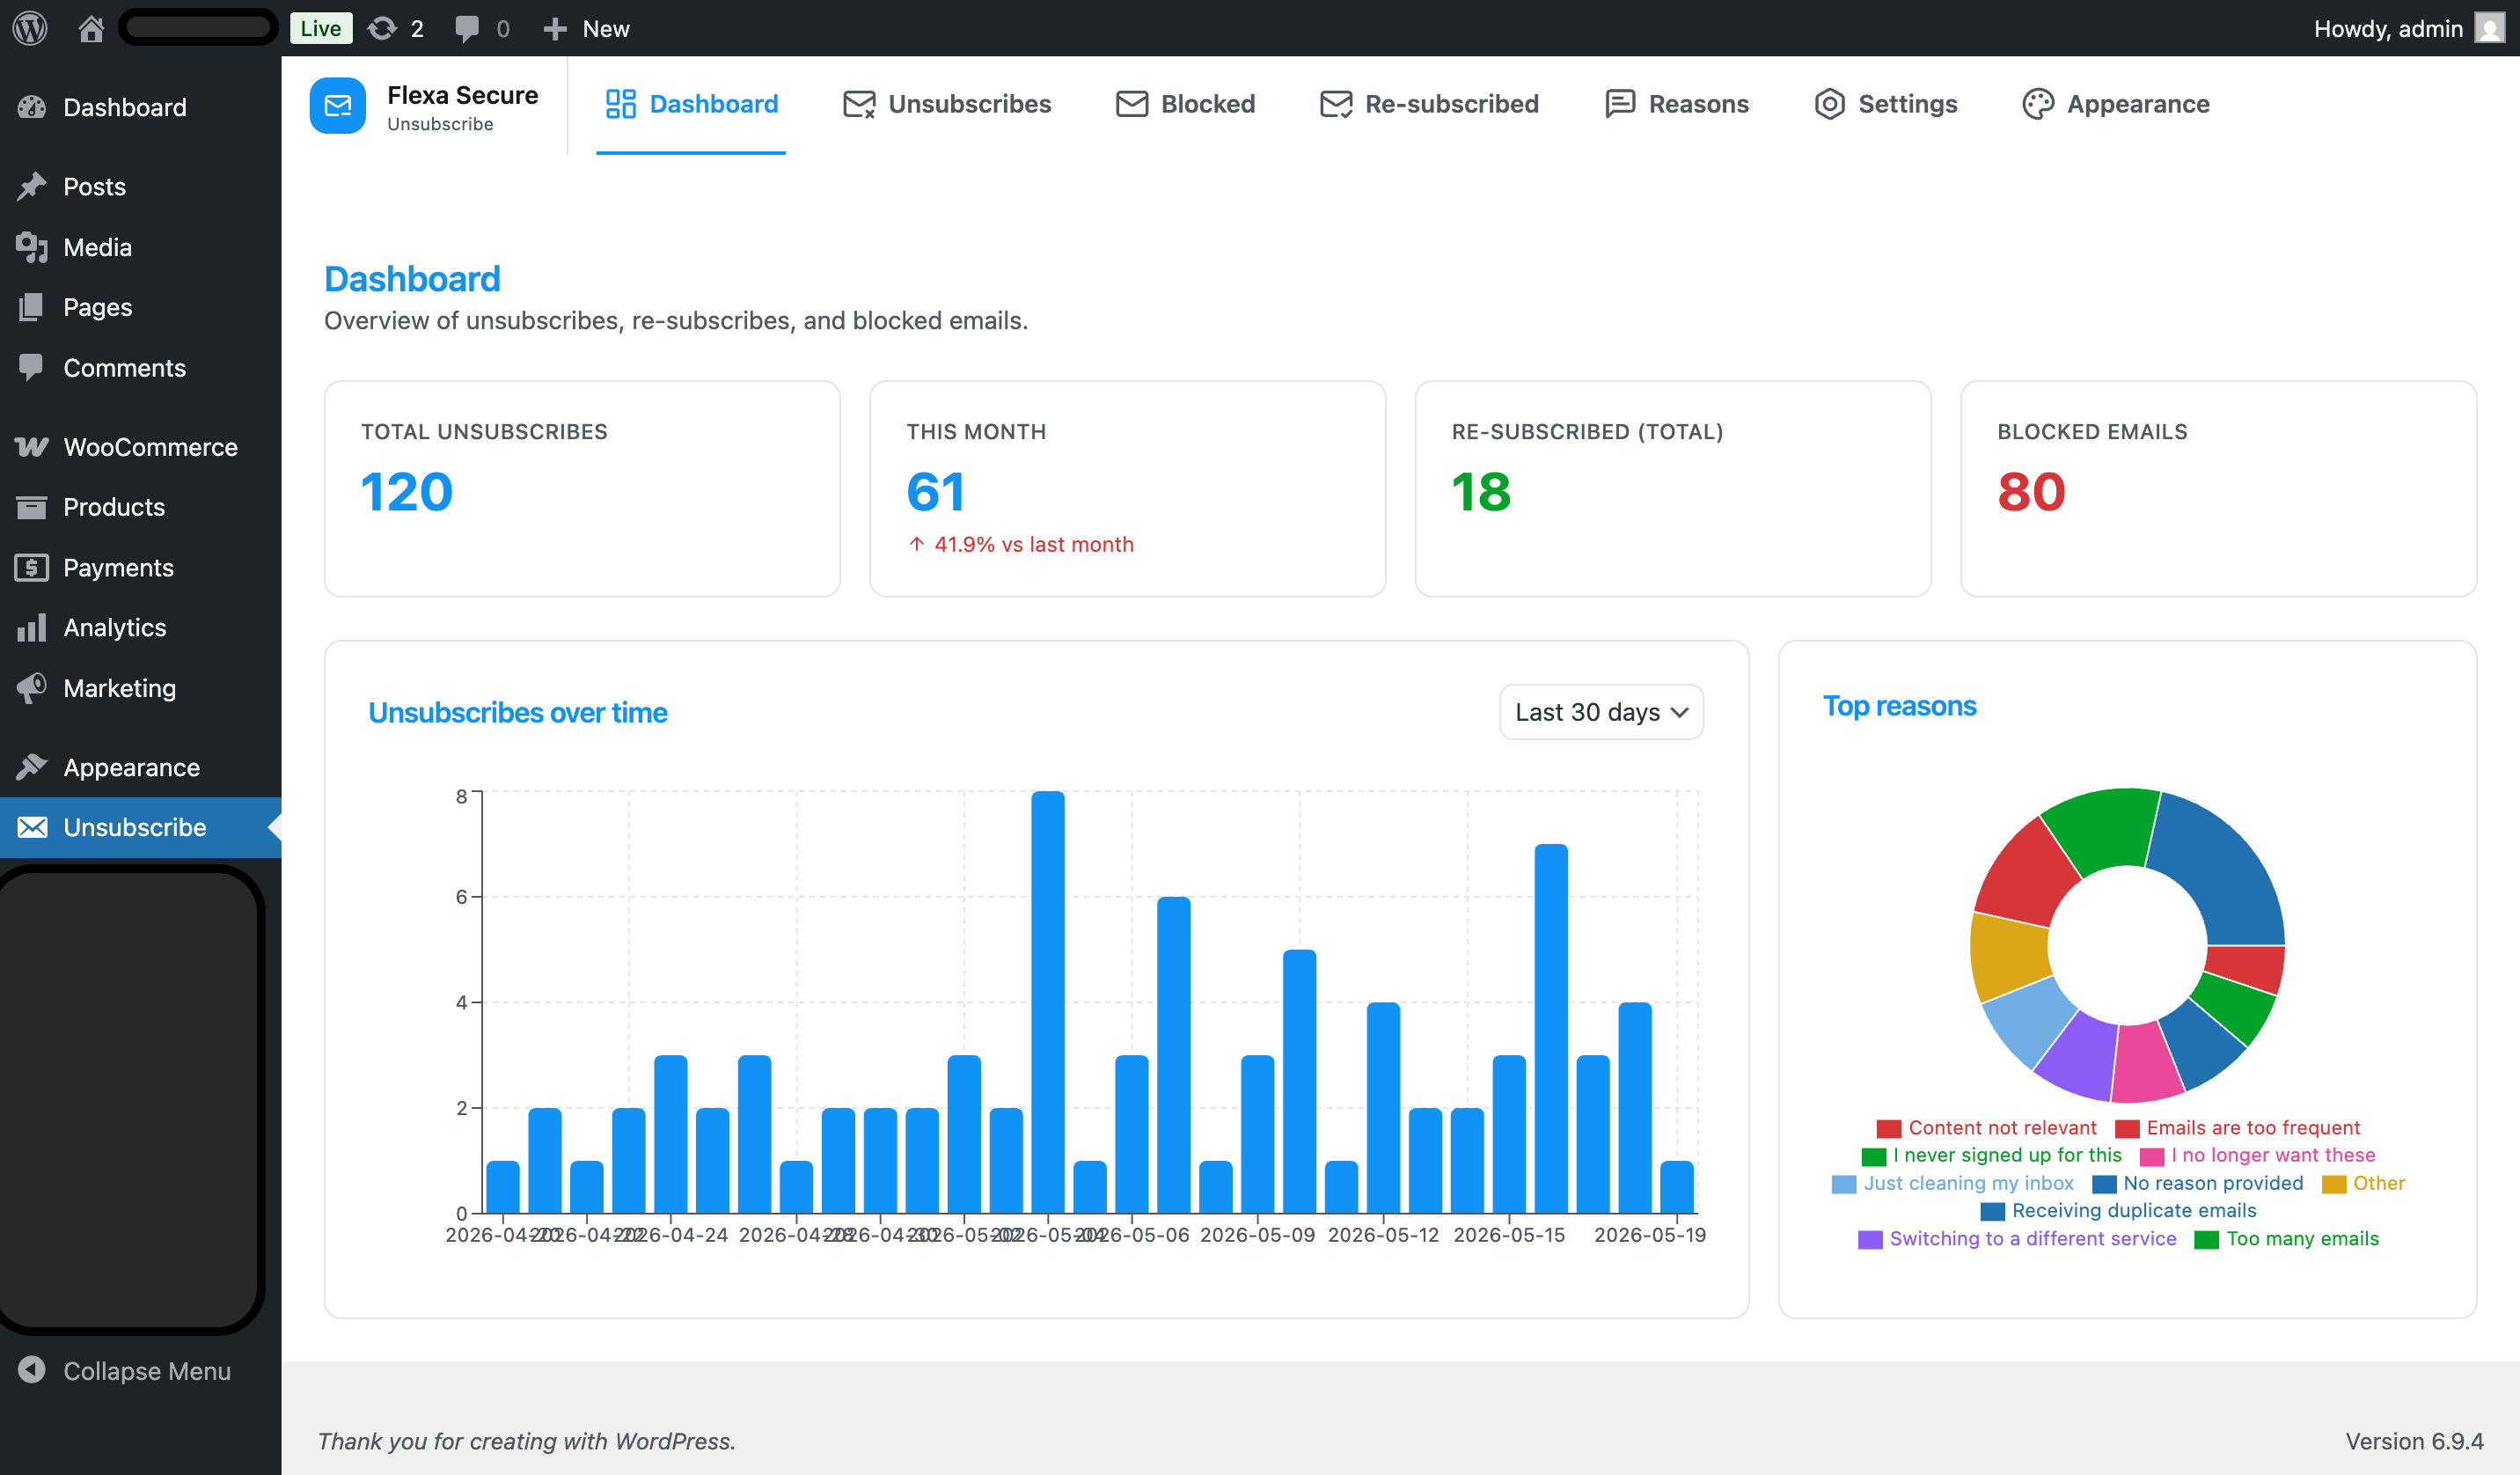
The Dashboard
The Dashboard is your at-a-glance health check: how many people have opted out, how many sends were blocked, and the trends over time.
You’ll see:
- Summary cards - totals for unsubscribes, blocked attempts and re-subscribes.
- Over-time chart - unsubscribes plotted by date so you can spot spikes after a campaign.
- By-reason chart - why people are leaving, drawn from the reasons you configure later in this guide.
Step 3
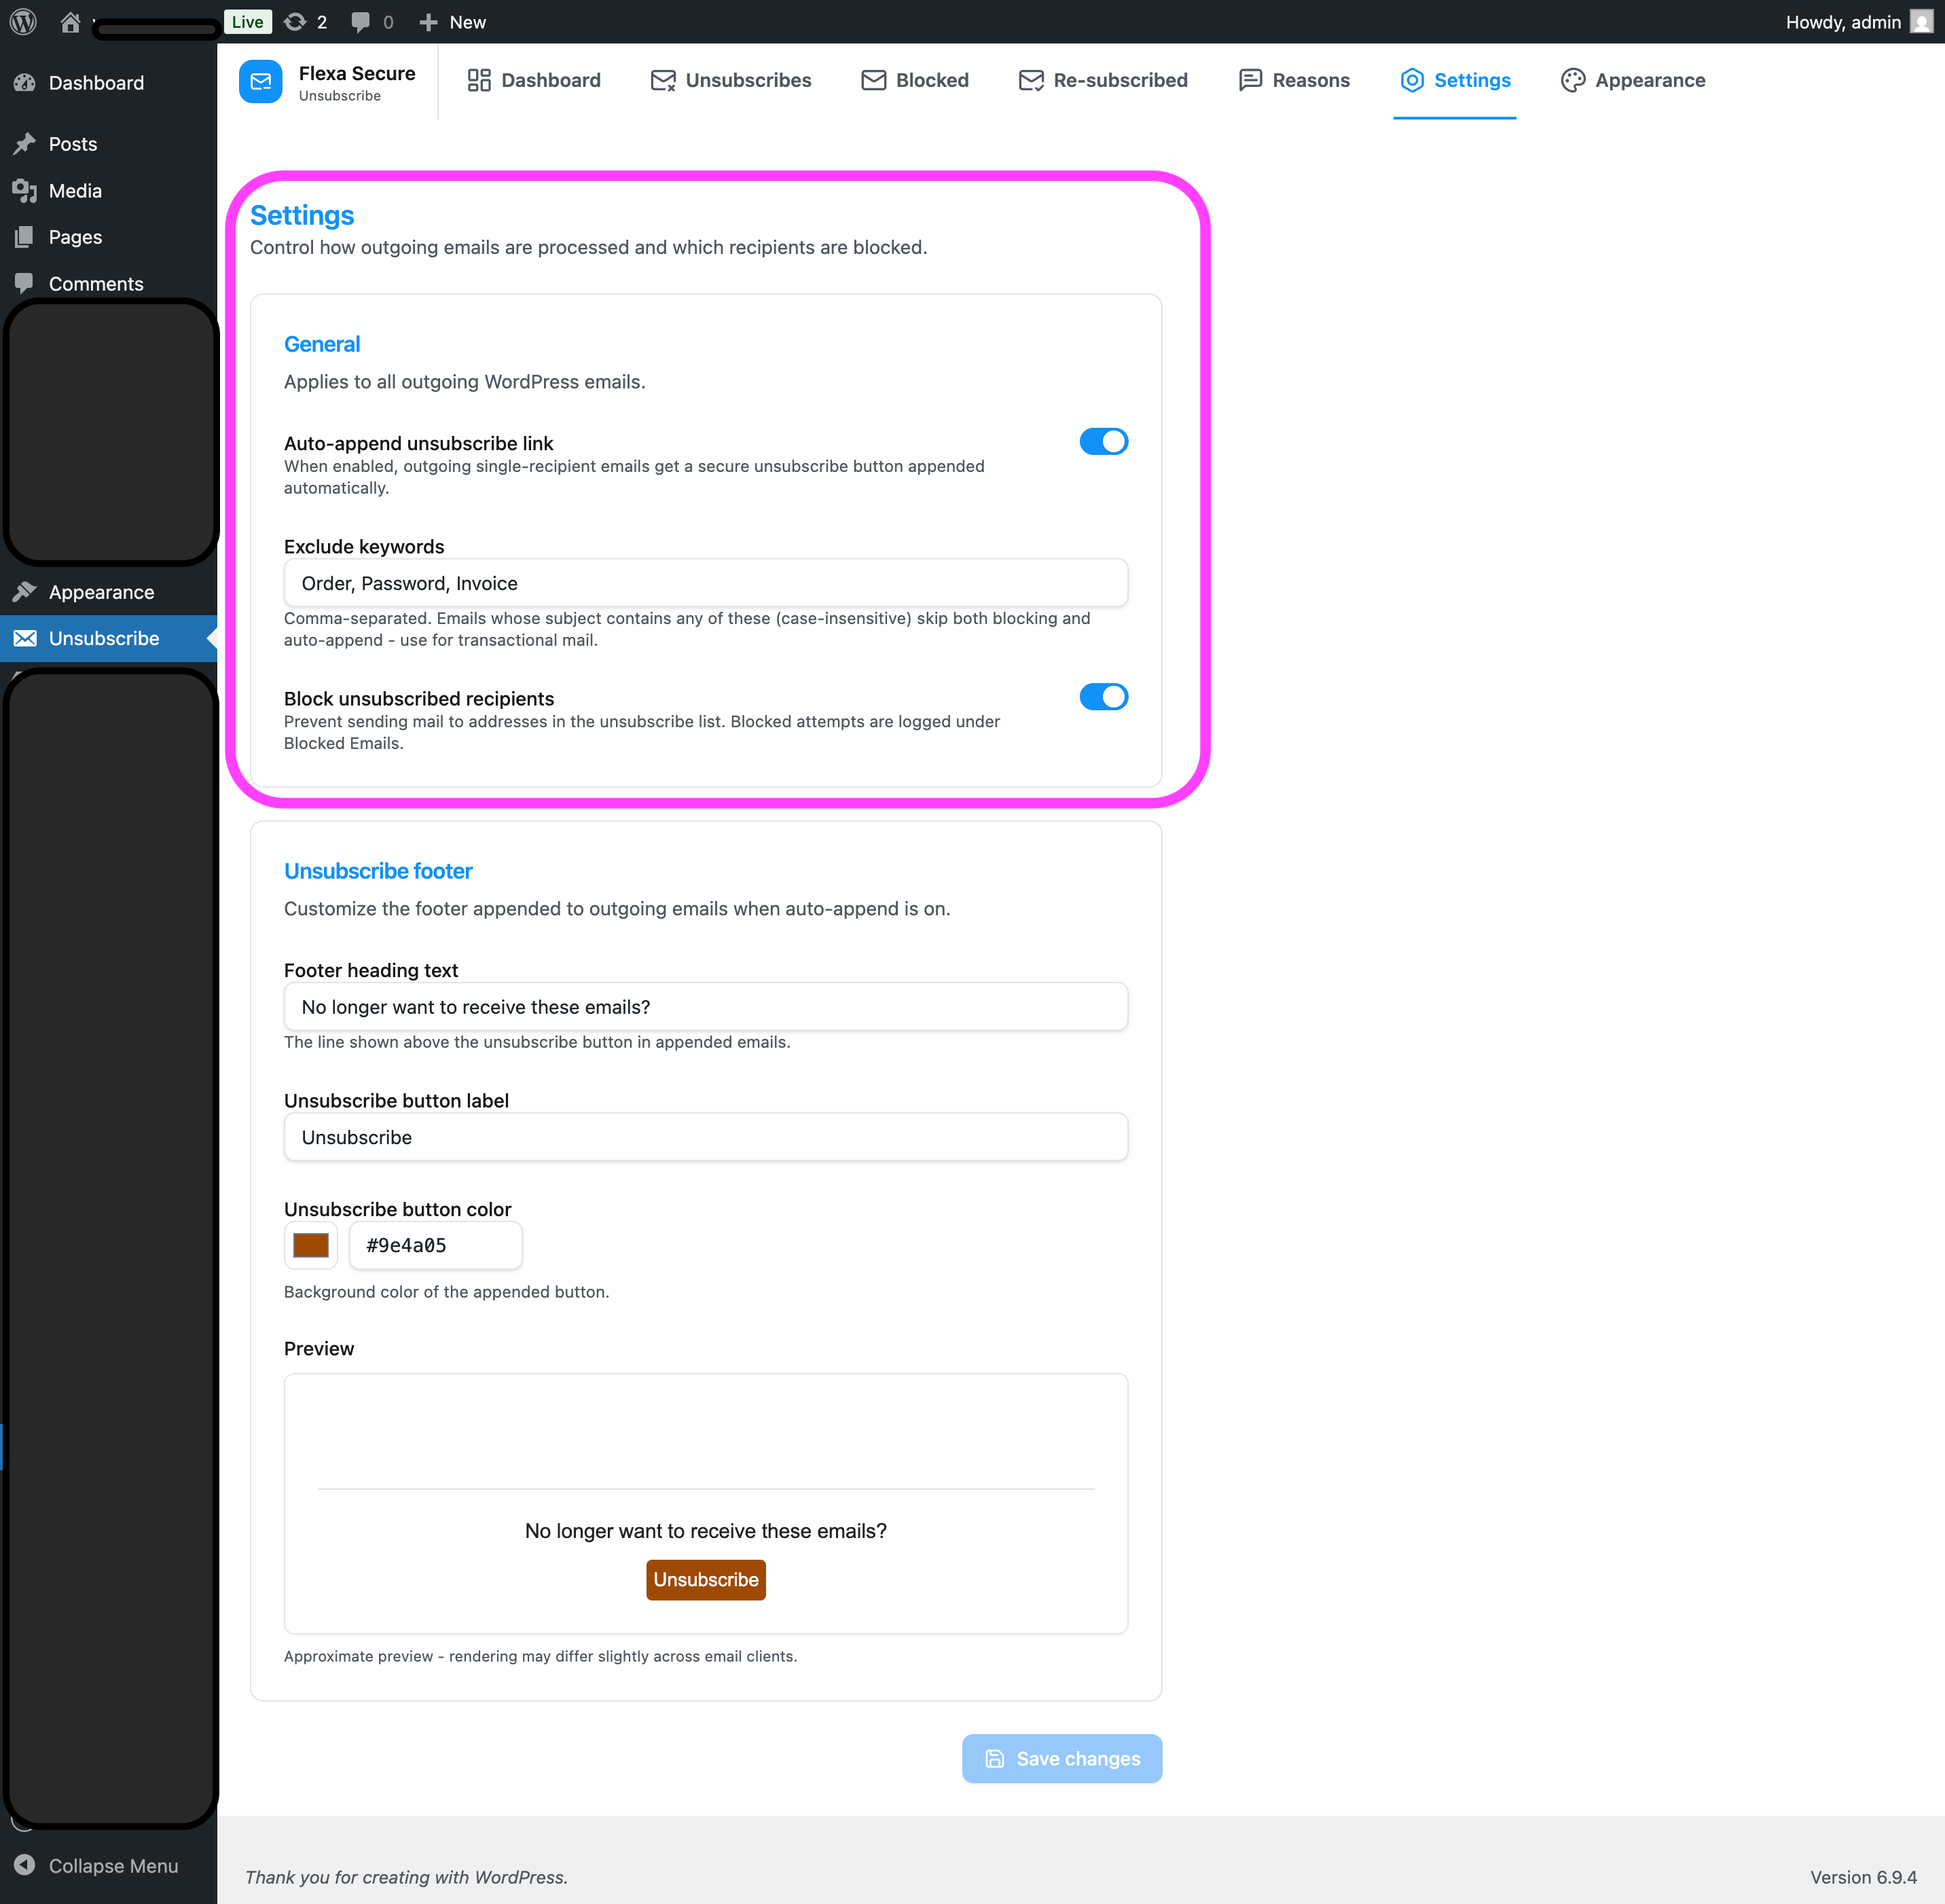
Turn on protection (Settings → General)
This is the one screen you must visit to make the plugin do anything. Open the Settings tab.
- Turn on Auto-append unsubscribe link so a one-click unsubscribe button is added to outgoing emails that go to a single recipient.
- Turn on Block unsubscribed recipients so the plugin refuses to send to anyone who has opted out. Every blocked attempt is logged (see Blocked Emails).
- Review Exclude keywords. Any email whose subject contains one of these words (case-insensitive) skips both blocking and the appended footer. The default -
Order, Password, Invoice- keeps transactional mail like receipts and password resets flowing. Add your own, comma-separated. - Click Save changes. The button stays disabled until you’ve actually changed something, and an “Unsaved changes” hint appears while edits are pending.
Use exclude keywords for important mail
Order confirmations, password resets and invoices should never be blocked or carry an unsubscribe button. Keep their subject keywords in the exclude list.
Step 4
Customize the email footer
On the same Settings screen, the “Unsubscribe footer” block controls exactly what the appended button looks like in the emails your recipients receive.
| Field | What it changes | Default |
|---|---|---|
| Footer heading text | The line of text shown just above the button. | “No longer want to receive these emails?” |
| Unsubscribe button label | The text on the button itself. | “Unsubscribe” |
| Unsubscribe button color | The button’s background colour (pick from the colour swatch or type a hex value). | #dc3545 (red) |
Edit any of the three, click Save changes, and send yourself a test email to confirm it looks the way you want.
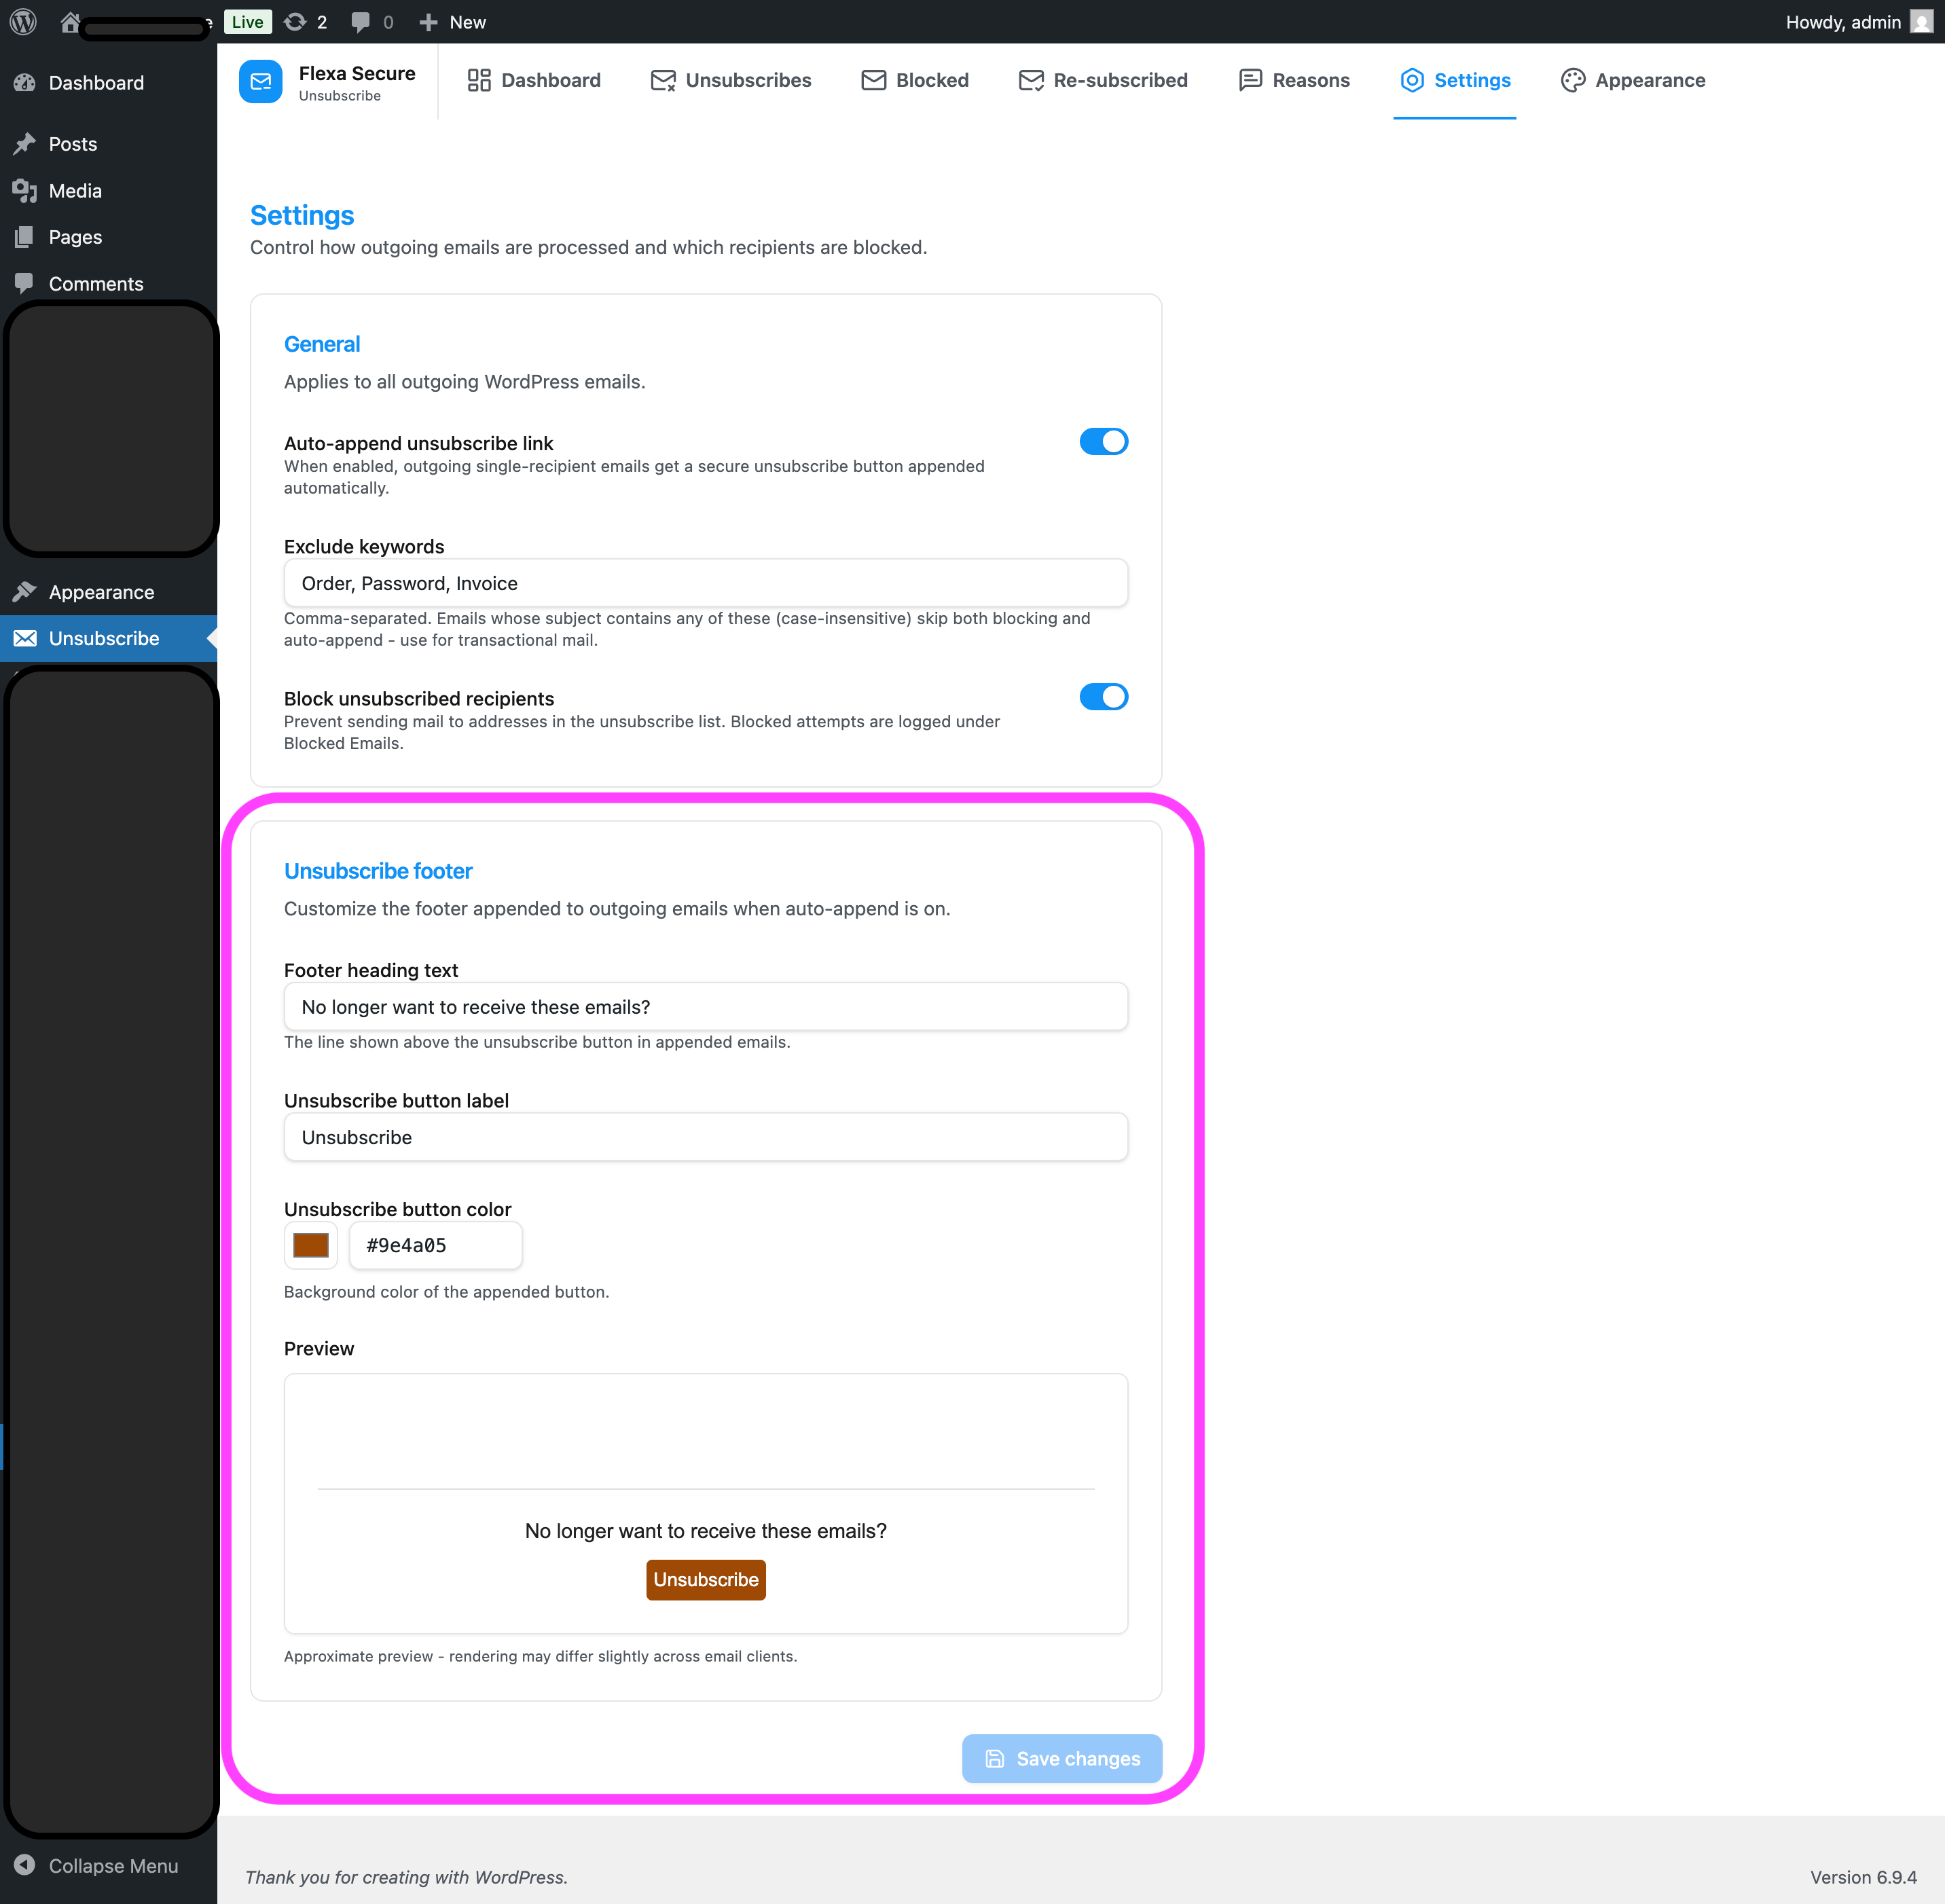
Auto-append must be on
These three fields only matter when Auto-append unsubscribe link (Step 3) is turned on - that’s what actually adds the footer to outgoing mail.
Step 5
Style the public unsubscribe page
When someone clicks the button, they land on a page hosted by your site. The Appearance tab lets you match it to your brand - with a live preview so you see every change instantly.
You can adjust:
- Colours - page background, card background, text, headings and the action button (normal + hover).
- Typography - font family (choose from a short list) and base font size.
- All the wording - the page title, the confirmation message, the feedback button, the thank-you text, the “back to home” link, and the messages shown for expired links and successful re-subscribes.
- Change a colour, font or piece of text on the left.
- Watch the live preview on the right update as you type.
- Click Save changes when you’re happy.
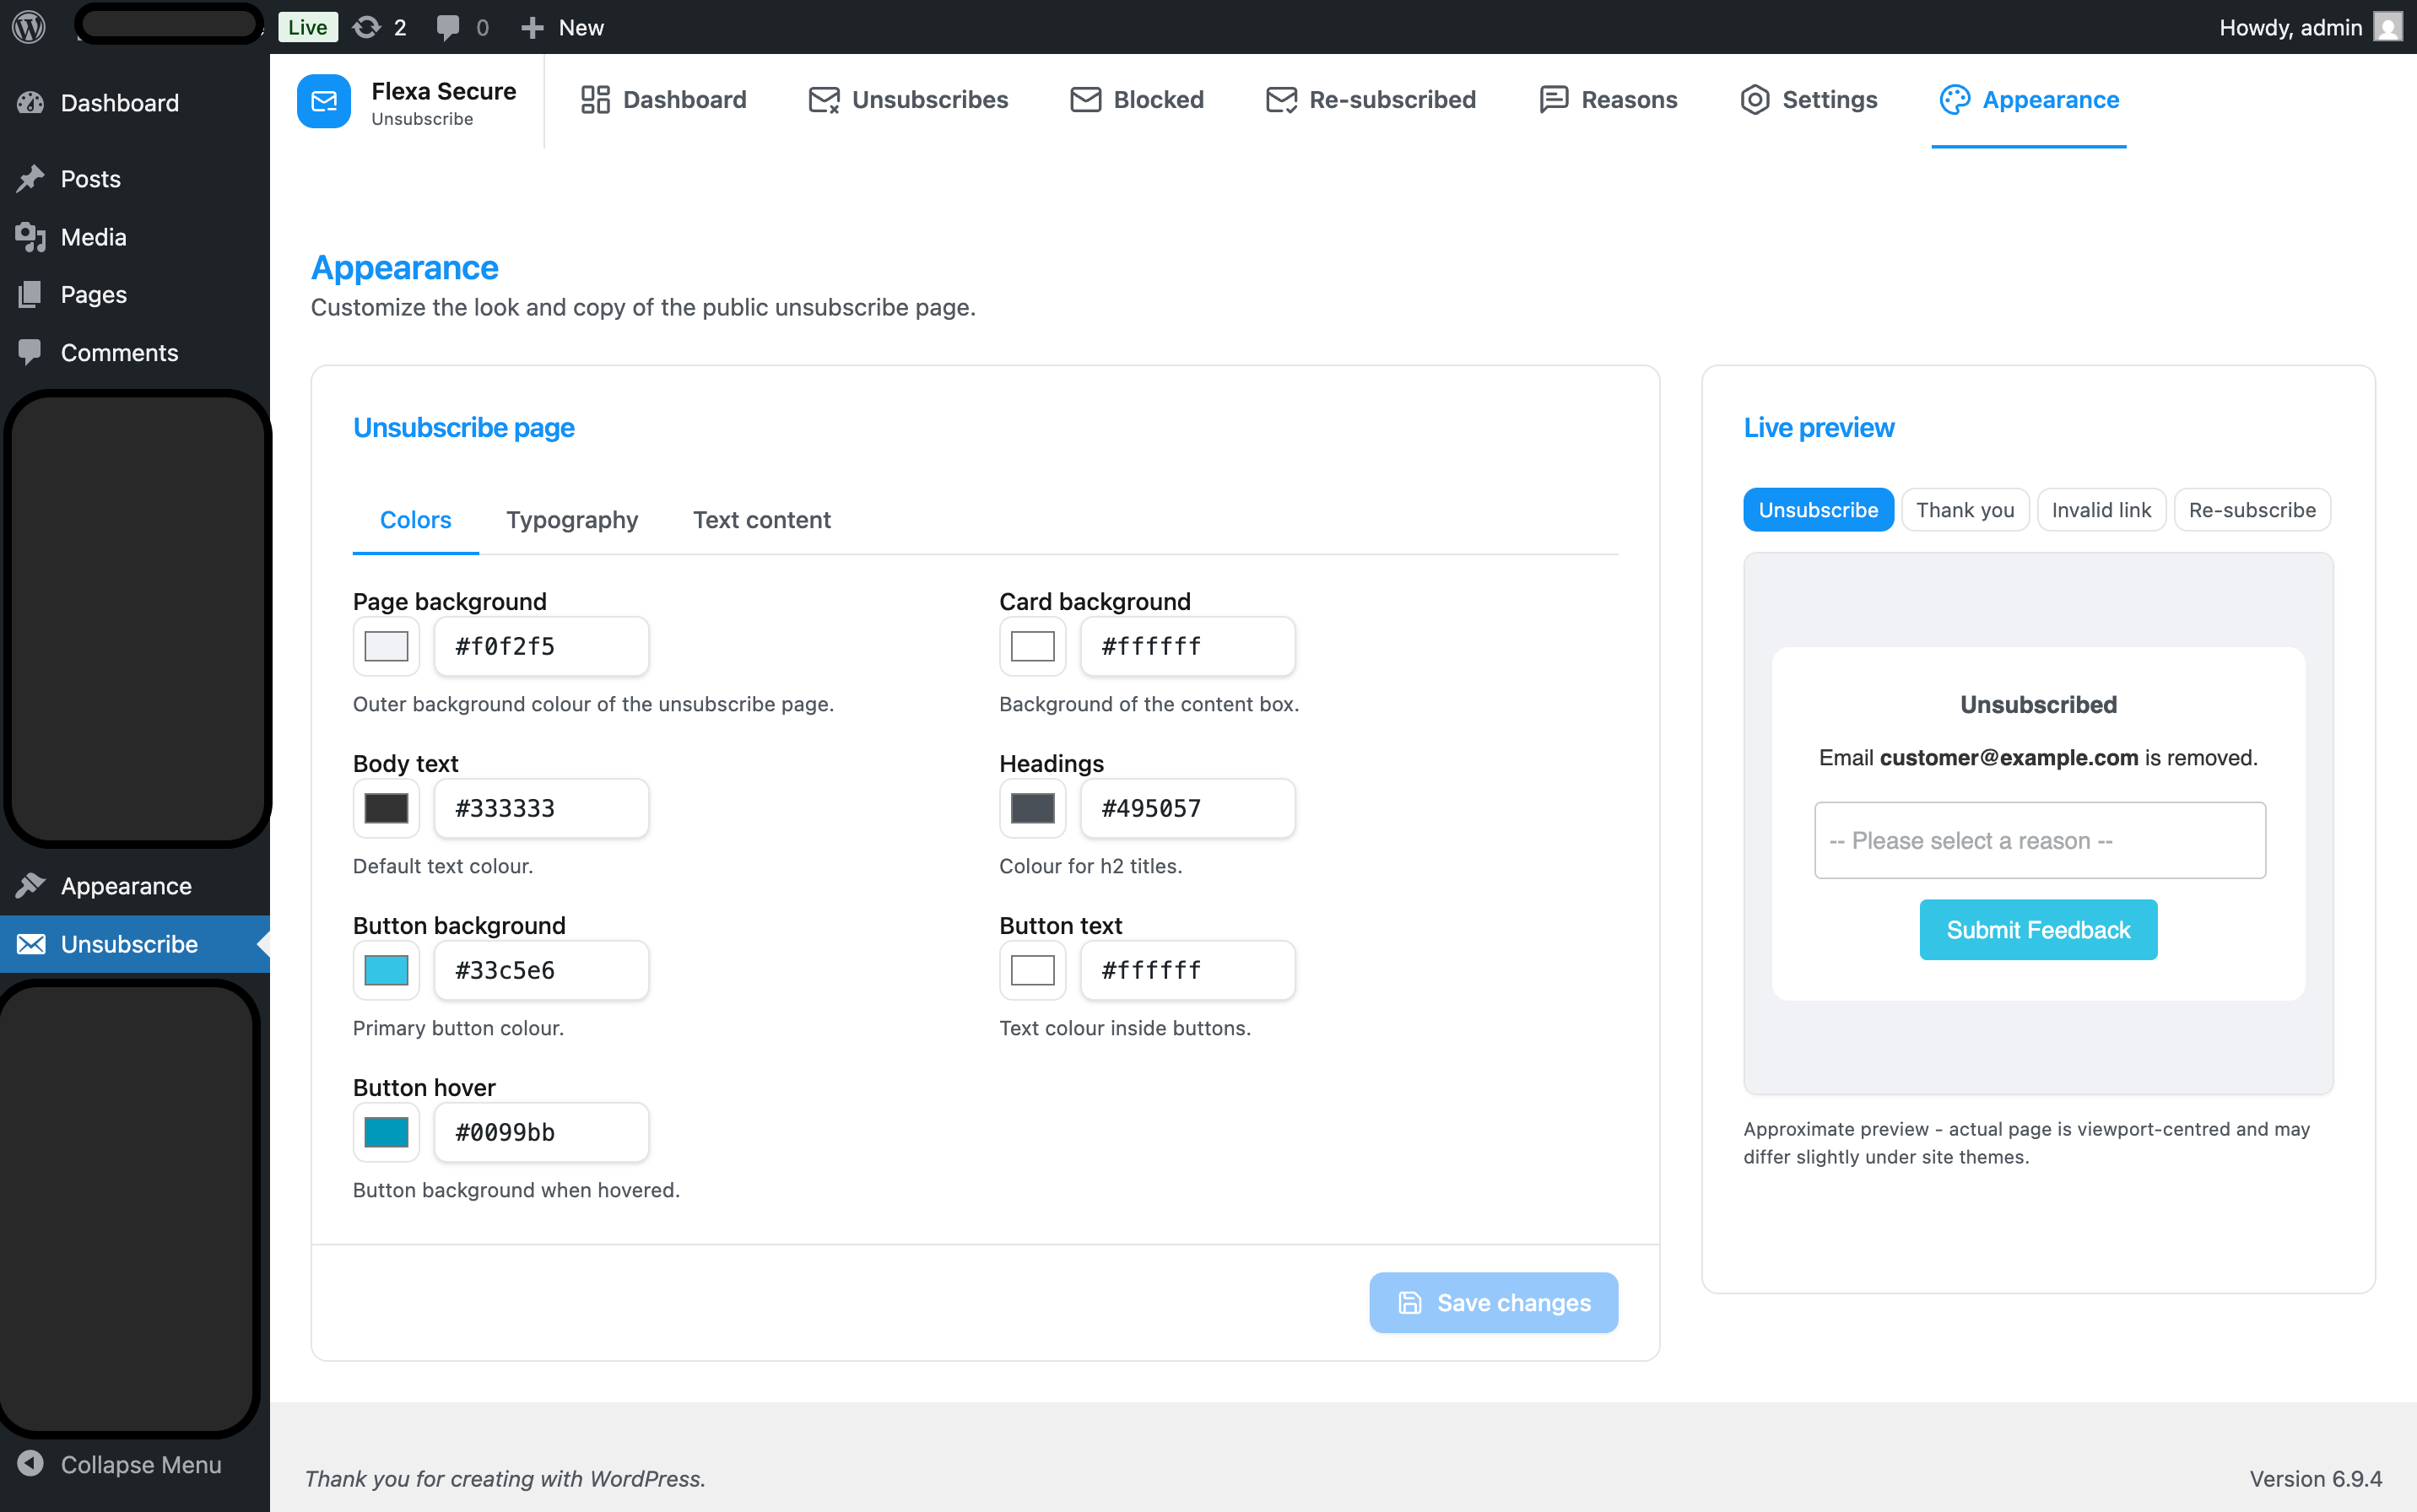
The {email} placeholder
In the success message, the text {email} is automatically replaced with the recipient’s real email address on the live page. Leave it in place if you want to show them which address was removed.
Step 6
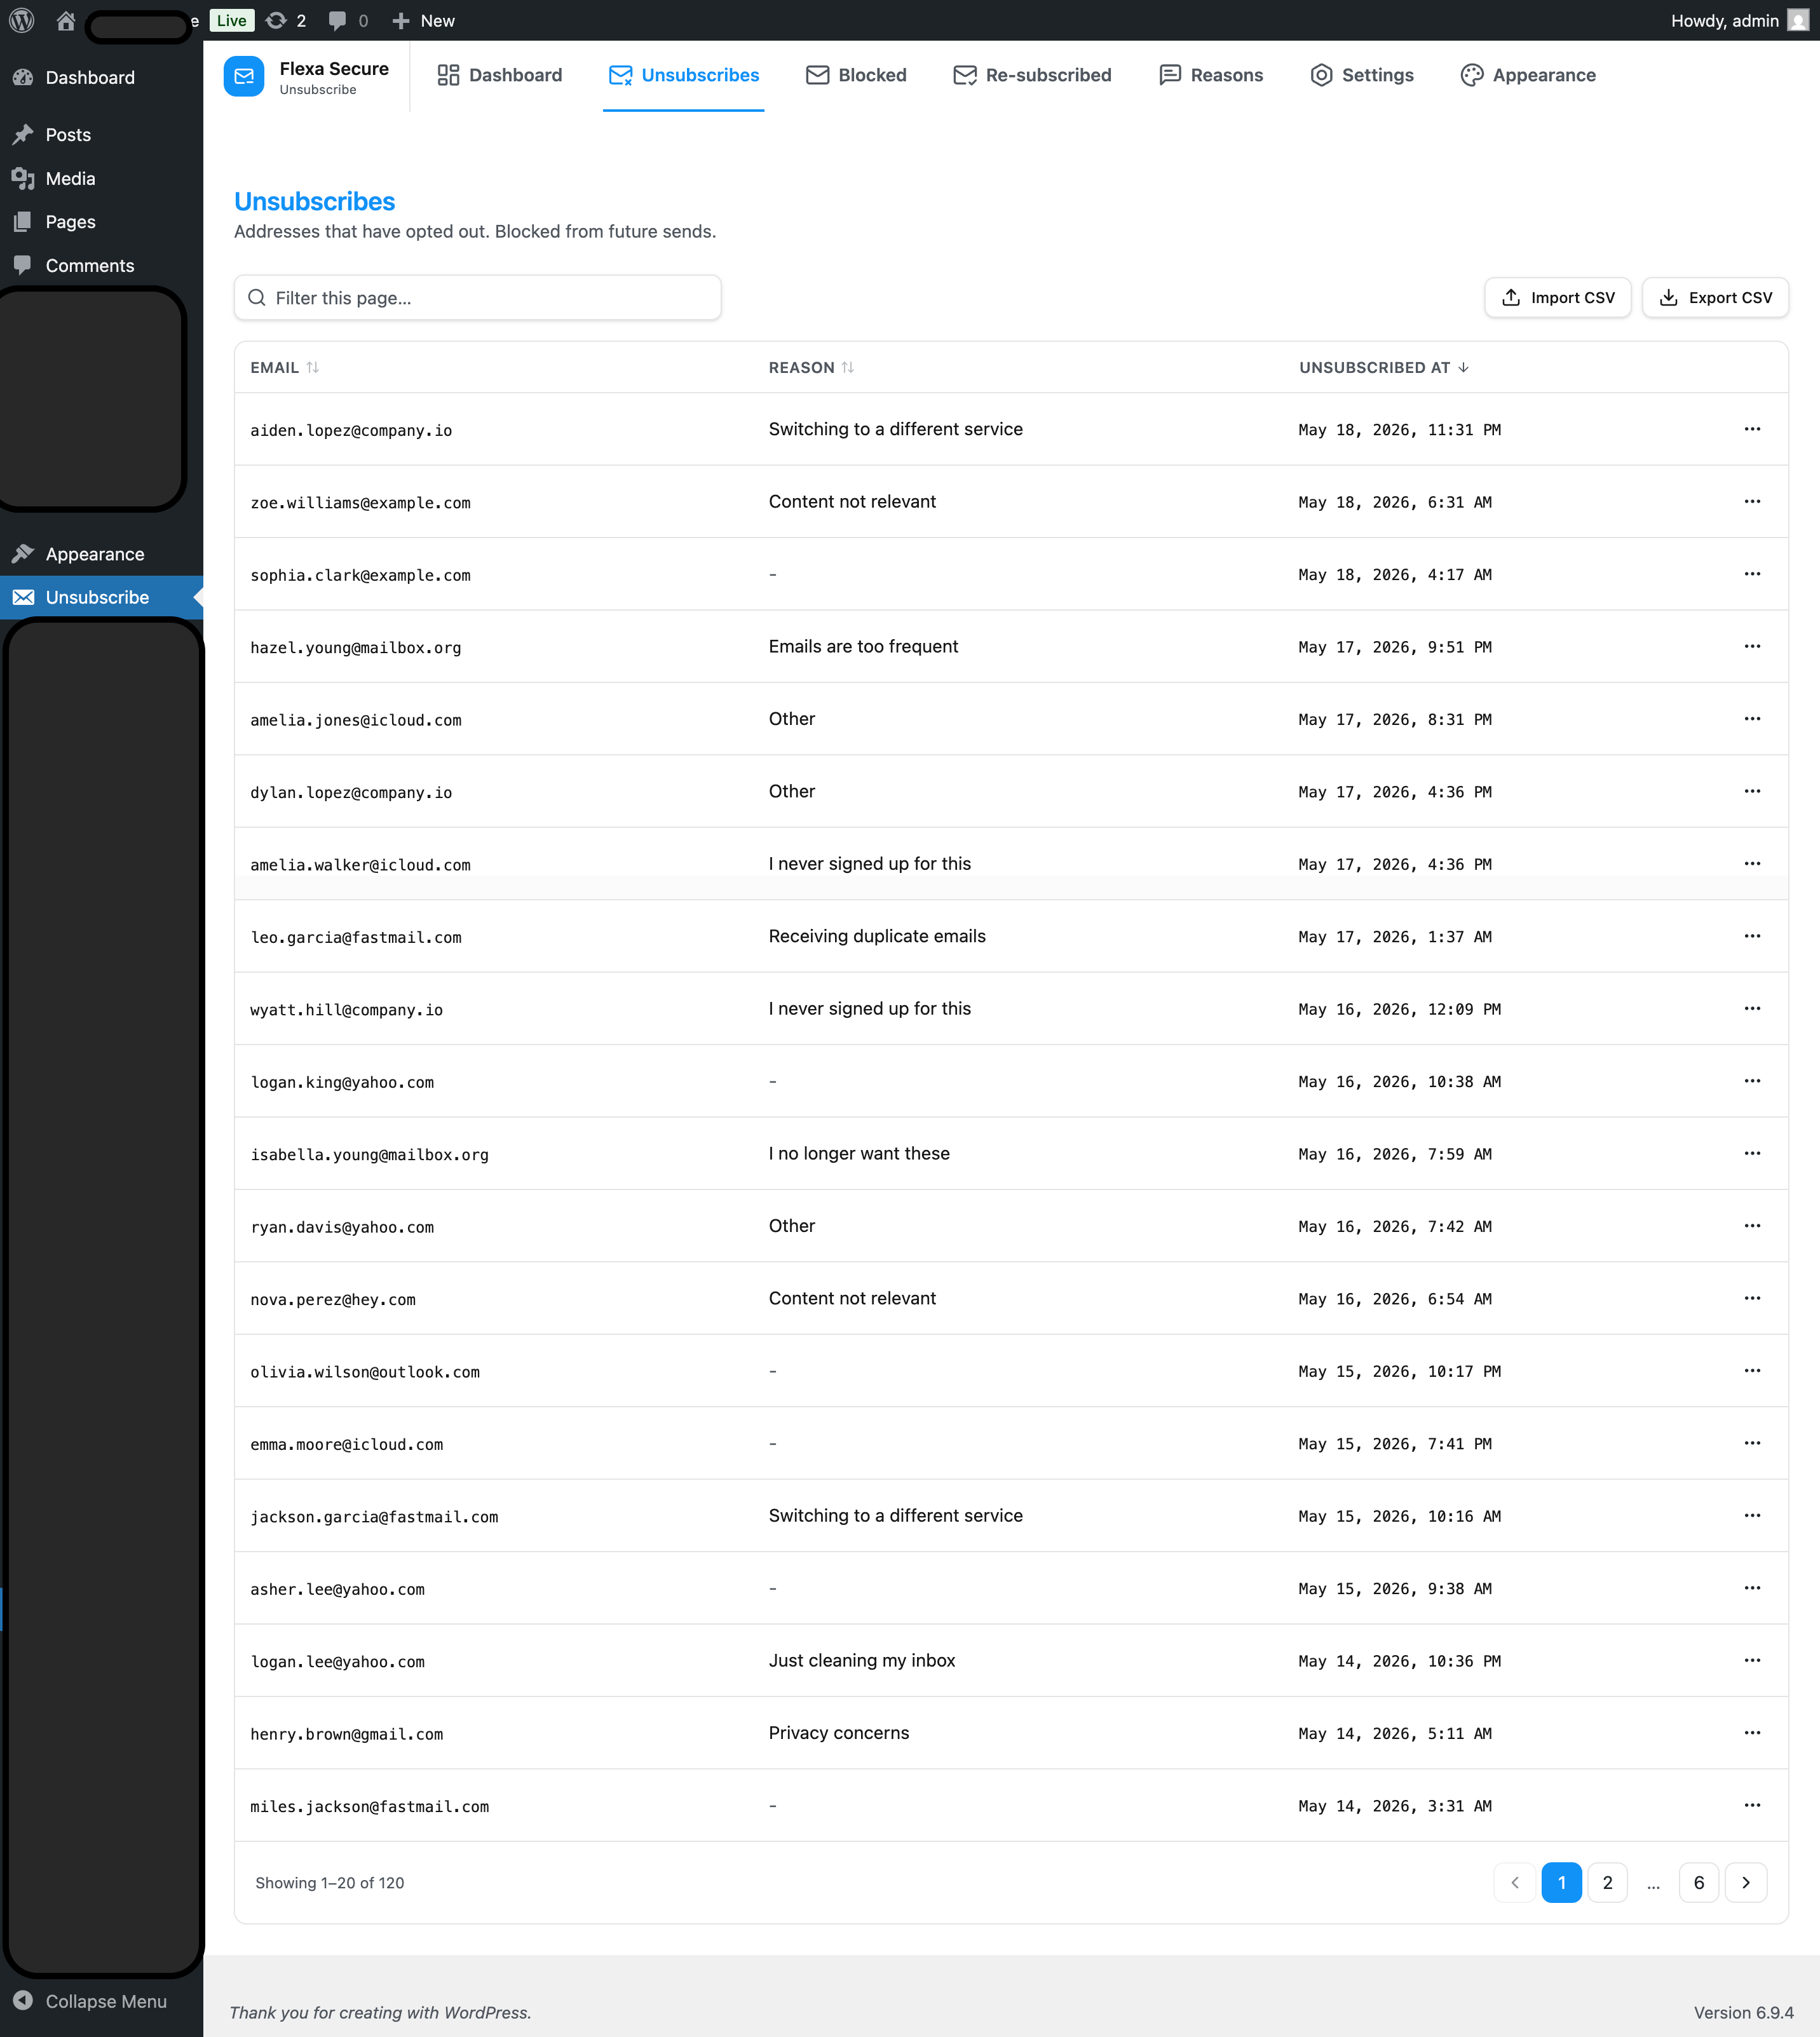
The Unsubscribes list
The Unsubscribes tab is the master list of every address that has opted out, the reason they gave (if any), and when.
- Search the list instantly as you type.
- Sort by clicking a column header (email, reason, date).
- Paginate through large lists. The page, sort and order are stored in the URL, so you can bookmark or share an exact view.
- Delete a row if you need to remove someone from the opt-out list manually (they’ll start receiving mail again).
Step 7
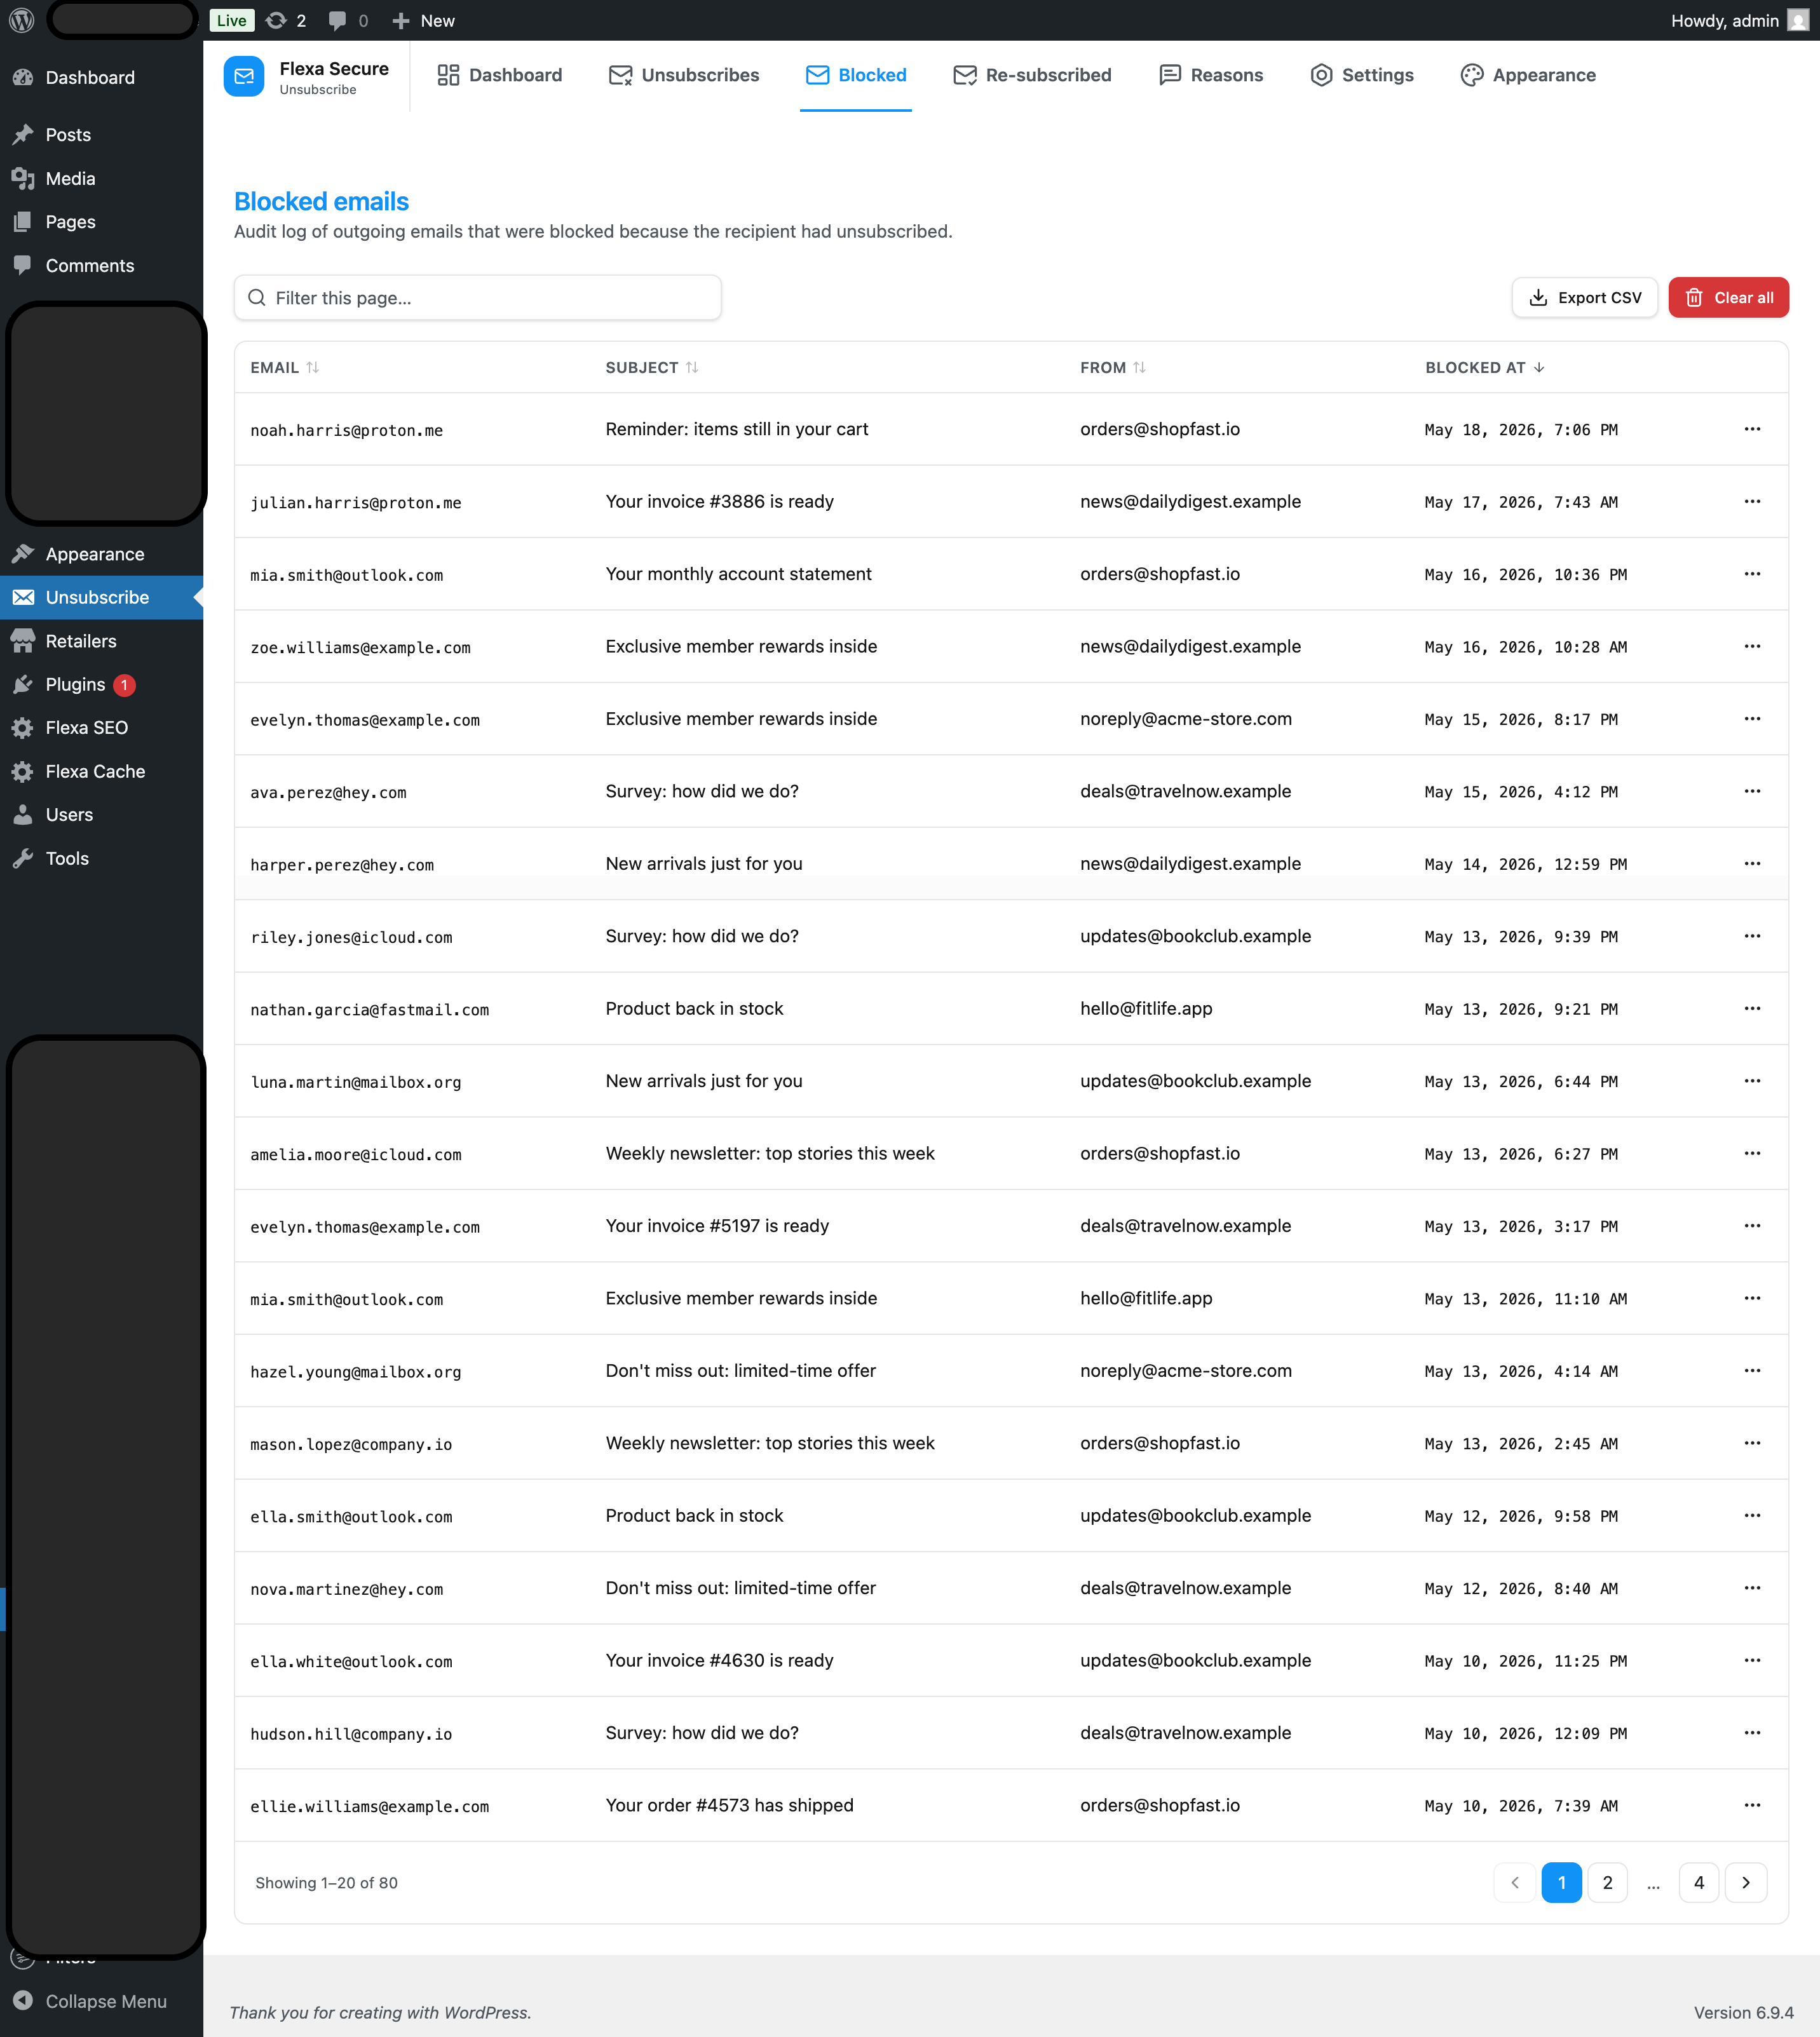
Blocked Emails
This is an audit log of send attempts that were stopped because the recipient had opted out - it is not the opt-out list itself.
Each entry records the recipient, the email subject, who it was from, and when the send was blocked. Use it to confirm the plugin is doing its job, or to investigate “why didn’t my customer get that email?”.
- Search, sort and paginate just like the Unsubscribes list.
- Delete a single log entry, or use the clear action to empty the whole log.
Step 8
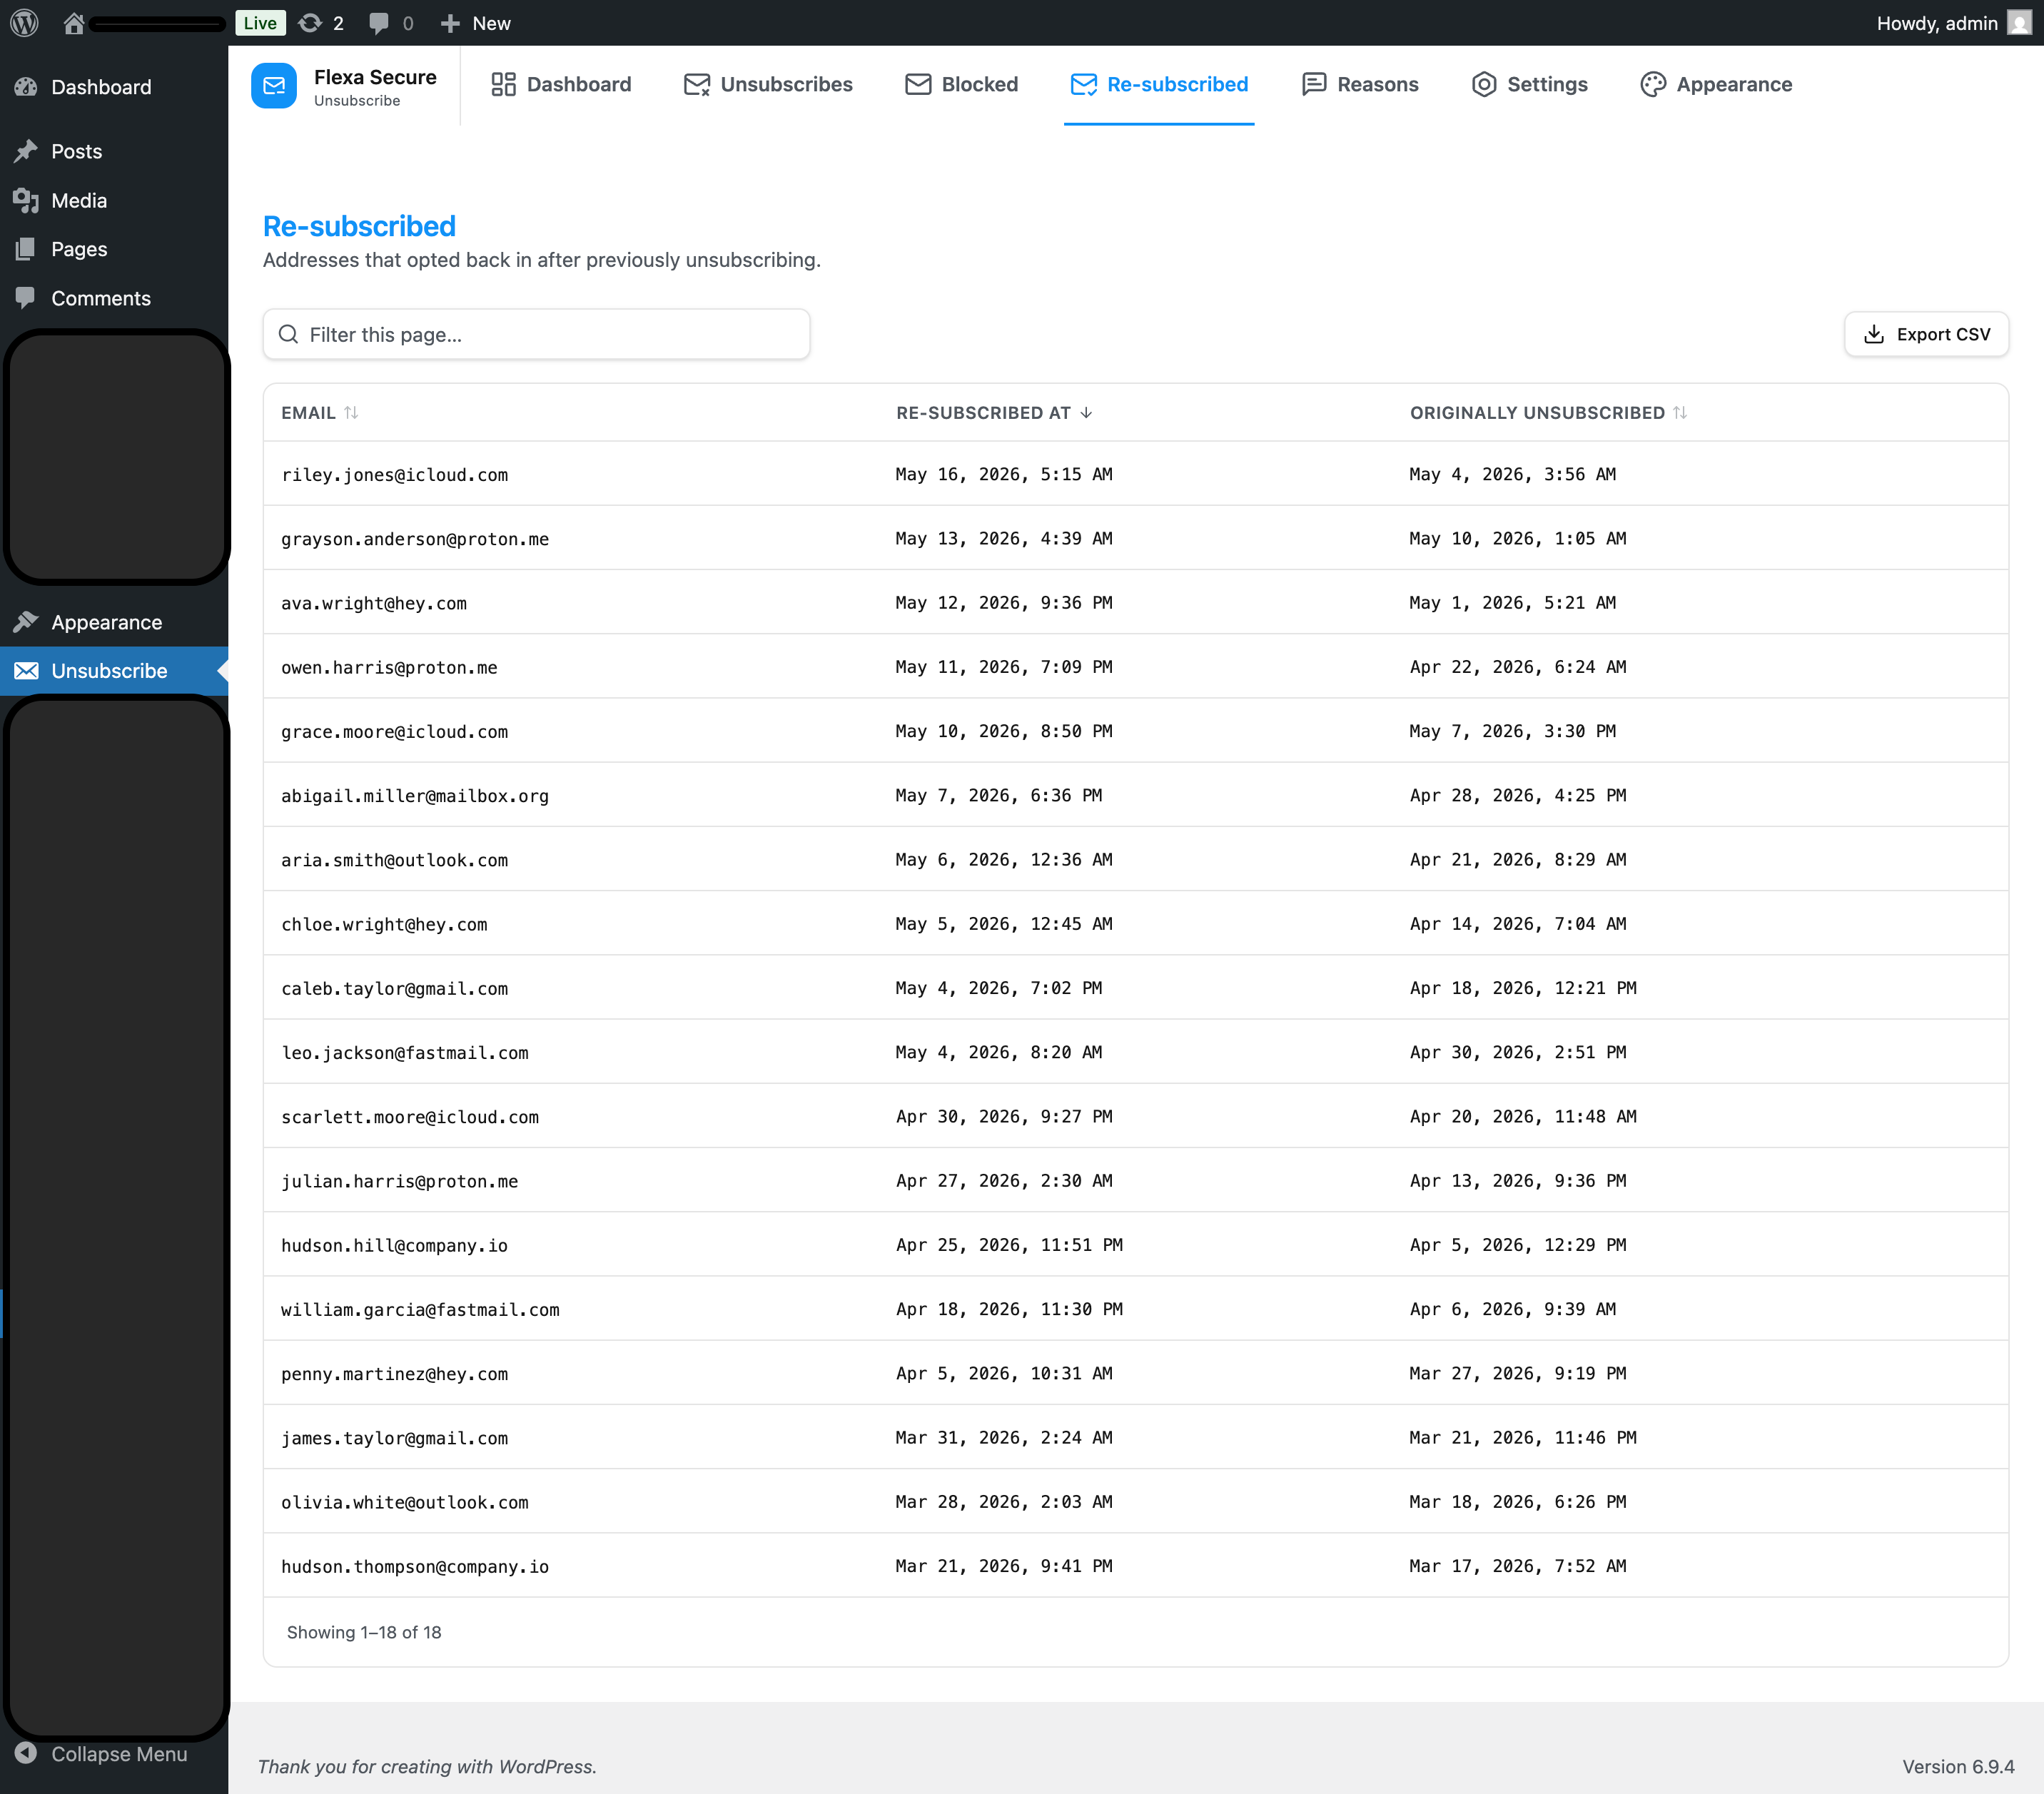
The Re-subscribed list
People who opted out can opt back in via a re-subscribe link. When they do, their row isn’t deleted - it’s marked re-subscribed and shown here.
This screen lets you see who changed their mind and when, which is handy for measuring whether a win-back campaign worked. Same search / sort / pagination controls as the other lists.
Step 9
Manage opt-out reasons
On the Reasons tab you decide which choices people see when they unsubscribe. Their selection feeds the “by reason” chart on the Dashboard.
- Add a reason by typing it and saving - it starts with three sensible defaults.
- Edit the wording of any reason in place.
- Reorder them so the most likely reasons appear first.
- Delete any you don’t want to offer.

Step 10
Export to CSV
The Unsubscribes, Blocked Emails and Re-subscribed lists each have an Export CSV button. It downloads the full list as a spreadsheet you can open in Excel, Google Sheets or your CRM.

Exports contain personal data
These files include email addresses (and, for blocked mail, subjects and sender details). Treat them as sensitive: only download them when needed, store them securely, and delete copies you no longer require.
Step 11
Import from CSV
On the Unsubscribes screen, the Import CSV button (next to Export CSV) lets you bulk-add opt-out records from a spreadsheet - handy when you’re migrating from another tool or seeding a new site from an existing export.
- Click Import CSV. A dialog opens with a file-picker and a link to download a sample CSV.
- Choose a CSV file. The expected columns are Email (required), Reason (optional) and Date (optional). A header row is auto-detected - so the file you got from the Export button re-imports cleanly. Headerless files work too: if the first cell is an email, columns are read by position.
- Click Import. After a few seconds you’ll see a summary: how many rows were imported, how many were skipped (because the email was already opted out), and how many failed (e.g. an invalid email) - with the row number for each failure so you can fix the file.
Existing emails are skipped, never overwritten
If an address from the CSV is already in the unsubscribes list, it stays put with its original date and reason. The import is idempotent - safe to retry, safe to run against a file that overlaps your current list.
- Limits. Up to 2 MB per file and 10,000 rows per import. For larger lists, split the file and import each piece.
- Missing Date. If a row has no Date, the import uses the current time.
- Permissions. Same as Export - only users with the manage_options capability (administrators) can import.
Help
Troubleshooting & FAQ
The unsubscribe button isn’t appearing in my emails.
Check three things: (1) Auto-append is turned on in Settings; (2) the email goes to a single recipient (the footer is skipped for multi-recipient mail); (3) the subject doesn’t contain one of your exclude keywords.
What’s the difference between “Unsubscribes” and “Blocked Emails”?
Unsubscribes is the list of people who opted out. Blocked Emails is a log of individual send attempts that were stopped because the recipient was on that list. One unsubscribed person can generate many blocked-log entries.
Someone re-subscribed - did their data get deleted?
No. A re-subscribe keeps the original row and simply marks it re-subscribed, which is why it shows up on the Re-subscribed screen. They’ll start receiving mail again.
Old unsubscribe links suddenly stopped working.
Unsubscribe links are signed with your site’s secret keys. If those keys were rotated (in wp-config.php), every link sent before the change becomes invalid. Recipients just need a fresh email with a new link.
A transactional email got blocked by mistake.
Add a distinctive word from its subject to Exclude keywords in Settings. Anything matching that keyword bypasses both blocking and the appended footer.
Need the technical details (REST API, hooks, database schema)? See the technical documentation.